Remote Desktop access
There are over 2,000 computers across campus. Some are managed by IT Services and are mostly accessible by all students. School-managed computer labs have restricted access and are only available to those that belong to the specific school/department.
How to connect to a campus computer using your Windows or MacOS device.
To use the Remote Desktop Connection to access a computer on campus remotely, you will need to make sure you have completed Steps 1 to 3.
Step 1: Connect to the VPN (Cisco Secure Client)
IMPORTANT - you will not be able to connect to a campus computer without connecting to the VPN first.
If you need help with the Cisco Secure Client VPN or with DUO, please click the links below. Once you have got these working, continue with Step 2.
Step 2: What type of campus computer are you connecting TO - Windows or MacOS?
- Open the Software & PC Availability system (Keyserver) by clicking the button below
- Make a note of the operating system of the computer you wish to connect to – Windows or MacOS. This is displayed as either a Windows logo or an Apple logo on the Keyserver site.
- The majority of campus computers are Windows machines. MacOS computers are available in Haslegrave - N006 and James France - CC128.
Step 3: What type of personal computer are you connecting FROM - Windows or MacOS?
You can connect to a campus Windows or MacOS computer from either a Windows or MacOS device. We are not currently able to support remote connections from other operating systems such as Linux.
If you are connecting from a MacOS personal device, you will need to download the Windows app from the App store (this application was formerly known as “Remote Desktop").
If you are connecting from a Windows personal device, the Remote Desktop Connection application will be pre-installed on your Windows computer.
IMPORTANT – when connecting to a campus computer, ALWAYS use the connection file that you have just downloaded. NEVER use an old file, as that machine may be in use.
Connecting to a Windows computer with Microsoft Remote Desktop
Important: Please ensure the machine you wish to use is available (green) before attempting remote access.
(NOTE – these screenshots are taken when connecting from a Windows computer. If you are connecting from a Mac, the screenshots will be different, but the process for connecting is the same)
- Go to the Software & PC Availability system.
- From the Availability Dashboard, click on your room choice.
- Check which machines are available. The colour coding will help with this. Green is 'Available' and Red is 'In use'.
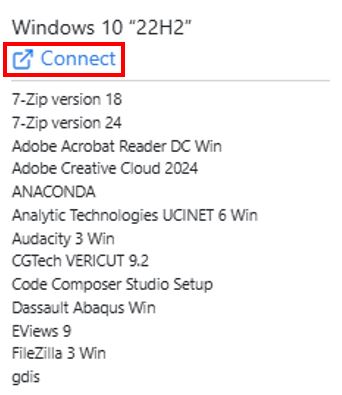
- Click on the icon of a free computer and then click ‘Connect’ to reserve it.

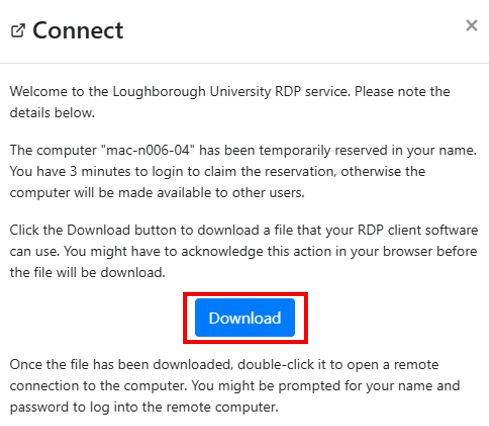
- Click the ‘Download’ button to download the file. This should automatically open the Remote Desktop Connection application, if it doesn’t, open your Downloads folder and double click on connect.rdp file.

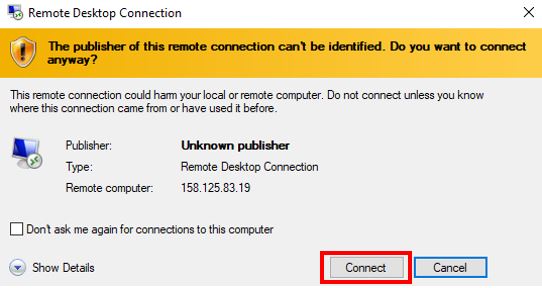
- Click “Connect” on the Remote Desktop Connection box

- When prompted, enter your University username and password, with LUNET\ before your username, then click OK. You may need to select “More choices” then “Use a different account” to be able to amend your username. IMPORTANT - the connection WILL NOT WORK if you do not include the LUNET\ before your username.

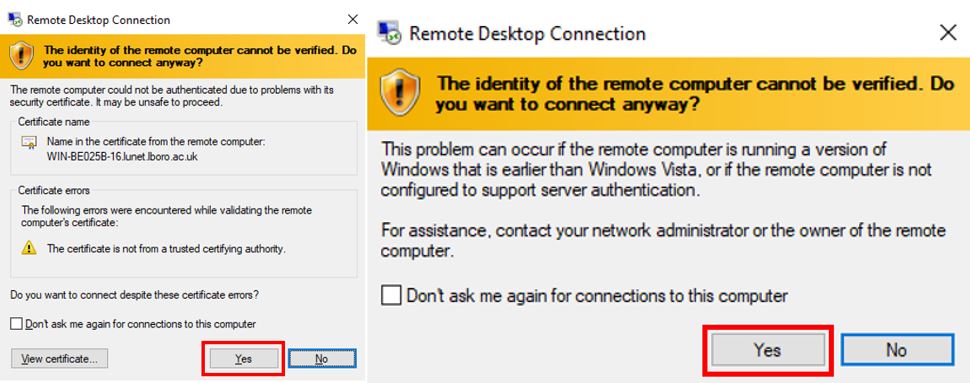
8. Next, click ‘Yes’

9. You will now be connected to the campus computer, which you will be able to operate as if you were sat at the machine.
10. Once you have finished the session you must log out to release the machine, by clicking the X on the blue bar at the top of your screen. ** BEFORE LOGGING OUT, MAKE SURE ALL DOCUMENTS HAVE COMPLETELY FINISHED SYNCING TO YOUR ONEDRIVE **
Connecting to a MacOS computer
Important: Please ensure the machine you wish to use is available (green) before attempting remote access.
- Go to the Software & PC Availability system.
- From the Availability Dashboard, click on your room choice.
- Check which machines are available. The colour coding will help with this. Green is 'Available' and Red is 'In use'
- Click on the icon of a free computer and then click ‘Connect’ to reserve it.

5. Click the ‘Download’ button to download the file

6. Open your Downloads and double click on the ‘connect.rdp’ file.
7. Click “Connect” on the Remote Desktop Connection box.

8. Click ‘Yes’, then ‘Yes’ again.

9. You will now be connected to the campus computer, which you will be able to operate as if you were sat at the machine. (You may need to sign in at the first screen)
10. Once you have finished the session you must log out to release the machine, by clicking the X on the blue bar at the top of your screen. ** BEFORE LOGGING OUT, MAKE SURE ALL DOCUMENTS HAVE COMPLETELY FINISHED SYNCING TO YOUR ONEDRIVE **
Software & PC Availability system
The availability dashboard displays information on real-time computer lab bookings:
- Current live bookings (red)
- Self-service 24/7 computers (Orange)
- Teaching labs – Taught (Blue)
- Remote access computers (Purple)
Software availability - The Software section presents an A-Z listing of software installs.
Maps - Search for computer labs close to your current location. Please check the digital signage outside the room to see details of upcoming bookings.